Sunday, May 23, 2010

The Iron Lung Arrives

Hello again,
This week we finished all the interior- secondary framing and most of the rough in wiring, plumbing and mechanical system as well as the soar thermal panels on the roof. There were two carpenters and three solar installers working outside plus six subcontractors inside that small space. I had to make sure they all synchronized their jobs and tools and not bump elbows or fight for ladder space. We were on a deadline to finish this week and start sheetrock next monday. We did not make it. One of the great lessons you have to take in as a contractor is to let go of failed goals and expectations. We worked a half day on friday to make ready for the twelve o'clock tour of "See the Machine" We had two tours on Friday and two on Saturday.
See you next week...........Terry

Arrival of.......... "The Black Box". AKA-The Iron Lung. AKA-HRV - heat recovery ventilator.

Guys and trucks on Thursday. The next day the place was cleaned up pretty and ready for the tour.

This is a fan coil-heat exchanger. The two red lines circulate hot water through a radiator exactly like the one in your car. The hot water is generated at the solar panels on the roof or in the hot water heater in the house or both. This fan coil box is set into the fresh air supply duct of the HRV and the cooler outside air is heated as it passes over the radiator. The heated air continues on to three heat/ fresh air ducts in the house. This is the primary heating system!! This replaces the need for wood stoves, furnaces, wall heaters or any other kind of heating device.

And.........up to 90% of the hot water required to heat the house will be captured from the sun. This is one of the key elements of a passive house. A passive house is called a passive house because it does not have an "active" heating system such as a furnace or a boiler. In the end, the passive house winds up with a drastically lower heating demand and a heating system with a few moving parts. Here the only moving parts are the 100 watts or so needed to run the fan for the HRV and the pump for the hot water circulation. But in a passive house even those 100 watts will recycle as heat back into the system. For that 10-15% of the time when the solar panels do not make and store enough hot water, the hot water heater elements will kick on to make hot water.

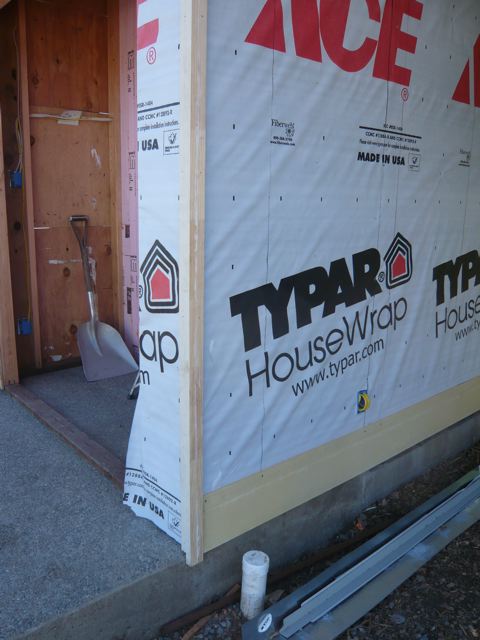
We used this furred out wall to run most of our electrical and plumbing lines. Behind the new framing is our precious air sealed, insulated sheetrock wall. This new kitchen wall and utility room at left and all the other new interior walls will get sheetrock after the wiring and plumbing is completed.

Sun First setting the mounting brackets for the solar thermal panels. Sun First donated all their labor and materials and sold us the panels at cost.

Hot water production.

Because we did all the insulation after sheetrock we needed a certified Thermographer to inspect the insulation behind the sheetrock. We did so by creating a twenty degree temp difference between inside and out. Andy Wahl of AC Home Performance Inc. came in with his ten thousand dollar camera and documented each and every wall cavity. Infrared cameras read surface temps. A 20 degree indoor/ outdoor difference dramatize outside cold air migrating in through the wall, floor and roof assembly and the camera will read the infiltration of cold air.

This is Andy Wahl's report: "On 5/21/2010 at 8 AM I did the Infrared Thermography on the second CLAM house. I would like to commend 'Mr. Insulation' for such an excellent installation of the insulation for CLAM Blue 2. This is the first QII I’ve ever passed on the first site visit. The outside temperature was 50.8 degrees and the inside temperature was 70.3 degrees. 211 pictures were taken inside, nearly every square foot of the walls and ceilings were photographed. This did not include several outside pictures on the North side or the ones of construction crew.

The level of insulation installation quality far exceeds any of the thousands of pictures I’ve taken. There were no signs of any missing insulation anywhere.

My thanks to Terry and his crew for making the thermal envelope possible to insulate and to Charles for his diligence of getting it install correctly (the first time). If all jobs were like this I’d be out of work.:) I would also like to thank those who allowed Cara and I to be part of this historic event."

Editor's note: CLAM thanks Andy and Cara for providing this service for Blue2 pro bono. Their contribution, along with many other donations of time, money, materials, and expertise is making this project possible. See list in right column.

Here we are looking at the viewfinder of the infrared camera. This camera is what is known as picture on picture. The center colored frame shows the temperature in degrees (65.2) in a pinpointed area (the star). The outer black and white frame shows the rest of the room as a reference. The colored scale on the right shows temps in degrees and color- 71.2 being the hottest surface in this frame. The light blue area between floor and window is an insulated wall cavity which is VERY uniform. The dark blue streak at the floor is the cold coming through the bottom plate of the wall assembly. The red (hot spots) are where the sun has already heated the window sill and frame.

James Bill on left and Peter Waring explaining the HRV system on tour number one.

Tour number four- Andy Blake and James Bill (hidden) explaining mechanical system.

Saturday, May 15, 2010

The passive house interior shell has now reached its final air seal.

Hello again,
It was another action packed week. The first shell of sheetrock was finished as well as all the insulation and we finished most of the interior framing and I did a final blower door test today on the current shell. Next week we begin the second round of rough in plumbing, electrical, sprinkler, solar and the mechanical HRV system.

We now have the "See the Machine" Tour scheduled for Friday, May 21, 12:00 and 4:00pm, and Saturday, May 22, 10:00am and 12:00pm. See the integrated solar and heat recovery ventilator (HRV) mechanical system. The solar hot water system supplies 80% or more of the space and water heating requirements.

Space is limited. To register, please sign up at http://CLAM.eventbee.com/event?eid=722734342. CLAM is requesting a $10 donation to the project, and no one will be turned away (for scholarship contact CLAM at 415.663.1005, info@clam-ptreyes.org).
Enjoy ... Terry

Here Charles is blowing in cellulose behind the sheetrock. Ordinarily, the sheetrock is applied over the insulation whatever it may be, but we wanted to pack the stuff into closed cavities. The challenge was to get a consistent tightly packed fill. It had to be done by "feel" and later by calculating the volume of the cavities by the pounds of bags used as well as drilling random sample test holes and "feel" the density by touch. In the end Charles estimated he blew over 4lbs per cubic foot which exceeds the required 3.5lbs per cf.
The wood blocks are to prevent blow outs and or bulging of the sheet rock, the rag is to slow down the backflow of cellulose into the room. Another worry was that if the blow in got too dense, it would blow out or bulge the sheet rock. The rock hangers put in extra screws to ward that off and we had no blowouts and very little bulging.

Messy business. the holes get plugged.

After the sheet rock was taped we are able to begin the interior walls. The passive house interior shell has now reached it's final air seal. As long as we don't puncture the air seal, all the remaining assemblies and walls can be built wild and crazy without concern for air sealing.We keep our 24" on center layouts to conserve lumber. All the future water and electrical lines have been stubbed and sealed into this shell where they will be picked up again to complete interior requirements.

Jorge standing where the washing machine will go. Bill and Sebastian are back in the bathroom.

Plywood section is a structural shear wall,not yet finished at
right. All the other walls will get sheetrock only.

End of day. here I am setting up the blower door for a test of the final shell. We got a 24 CFM air leakage. 24 CFMs @ 50 pascals, translates to a 0.21 ACH (air changes per hour) which is almost three times lower than 0.6 ACH- the passive house allowable air leakage. Moving right along toward Passive House certification!

Now we are back to old fashioned leaky electrical wiring and boxes. Now the heat and cool has no where to go except the next room.

Tuesday, May 11, 2010

Air Sealing Details

Hi again,
Last week was another action packed week. The sheetrock hanging was finished today (friday) and 3/4 of the exterior siding was completed. For me it was an intense focus on the final air sealing details and finishing the boron spraying of all the interior walls and rafters before sheerock. Next week we plan to finish the siding, finish all the blow in cellulose and fire tape all the new sheetrock and finally do our blower door test for the completed interior shell.
Enjoy .... Terry

Any good morning starts out with tea. Here, Charles and I are sitting on bales of cellulose to be blown into roof and wall cavities.

Every penetration/ puncture in the envelope was sealed on both sides of each layer. Every hole was made slightly larger than the pipe to allow the flexible caulk to fill the gap, thus not relying on a tight wood- to- pipe seal that could open over time with expansion and contraction. The penetrations were also sealed on the exterior side of plywood where it meets the exterior foam and again where the foam meets the siding. so each pipe here gets sealed four times from interior to exterior. Here we see a plywood shroud around three punctures so the sheetrock can be set in a bed of caulk around the penetrations. Every puncture had at least a 1" wood backing/ bed for the sheetrock to seal onto.

The sheetrockers at first did not get the importance of air sealing the key connections. I had to watch every sheet going up until I was confident they understood every contact point had to be perfect and all their caulk lines had to continous and fat enough to fill the gap. Here Louis is calking the plywood shrouds and edges of the framing at floor and end of sheets.

As drawn by architect- yes that is an exterior roof jack on the inside of the room. The sheetmetal is caulked and sealed against the plywood- the rubber flange is the air seal.

This is a standard plastic switch box. I wanted to see if I could make it airtight with a flange in front in which to seal the sheetrock, mimicking the special ones we bought (below). The wire holes in the back of the box are packed with duct sealer putty.


Air tight electrical box blobbed with caulk and ready for sheetrock. These airtight electrical boxes are made in Minnesota where the cold weather demands higher standards for air sealing. Here you can see the wide flange in which to apply caulk to seal the sheetrock. Note: the run of caulk at bottom plate ready for sheetrock-that missing spot in the caulking was corrected).

The cellulose insulation will be blown in after the sheetrock is in place.

Squish out is what I like to see. Here you can see a good caulking seal between the sheetrock and 2x6 sill of the window.


1 1/2" holes were drilled in every rafter bay at end blocking.

Charles then blew in insulation into each cavity from the outside at 3.5 lbs per cubic feet- AKA dense pack. Each hole will be plugged and sealed. We decided to insulate all the walls this way rather than blow in wet cellulose into open cavities or blow in dry cellulose behind netting before sheetrock. Wet pumped cellulose would require a long period of drying time before sheetrock could be done and we did not want to wait or run dehumidifiers for a week to dry out the cellulose.

Sunday, May 2, 2010

A Passive House, Pink Side Out

Hi all,
This week we completed the second roof foam insulation and plywood skin. Also finished the exterior pink foam to mitigate our thermal bridging of the wall assembly. We completed the roof shingles and gutters as well as the front entry framing and roof. On the inside we punched our last hole in the exterior plywood/ air seal and stubbed out for all the second wall connections. There were twelve holes in total including water and waste lines, sprinkler, communications, HRV (Heating Recovery Ventilator), solar, PV (photovoltaics) and electrical. For me it was counter intuitive to drill holes in an E ring assembly. The sound of each hole being drilled or cut set my nervous system on fire.

On Monday I will finish sealing all the new holes and retest with the blower door to see just how well we sealed up the holes.
Enjoy ... Terry

Pink side out- roof started.


Corner trim and first Hardi Plank siding started. Outlet hole is not in air seal assembly but intentionally infront storage area to prevent puncture in air seal assembly.

Dryer vent raceway. Here we used a 4" ABS pipe and fixed it tight and rigid
to the framing. Normally one uses a soft and somewhat flexible steel or aluminum exit pipe which would be very hard to seal up at each puncture. Movement of the soft through wall pipe would or could break loose at the seal and leak air as time goes by. Here the intention is to supply a permanent solid conduit for the dryer vent. This vent will also get a plywood shroud around it for air sealing the sheetrock against.

Finishing pink side out.

If foam was fun it might look like this.


Note how the pink foam sidewall meets the polyiso roof foam overhang so thermal bridging is not broken at corners except for those pesky rafters.

Boron ahead of foam.

Sun First, who are donating their time to CLAM, are installing the support feet for the solar thermal (hot water) panels. Each foot gets a roof jack covering with a leg poking out to support the panels.

Here James Bill at left, Andy Blake a solar project manager/consultant (pro-bono) and Dan Smith of Sebastopol Heat and Cool are finishing up a three hour on site meeting to figure out where and how to install the HRV system with the solar thermal and all the other hardware associated with the mechanical system of the house. There were probably a few hundred emails, debates, discussions, meetings and drawings before this meeting to reach a final design. A standard HVAC system might take two to four hours to reach design. But we have never done it quite this way before, putting the HRV and solar thermal together. It's like building the first car or the first airplane. These are the pioneers of the first passive house in California.